Tuesday 2 December 2014

Sci-Fi Racing Game Texture Panels: Made a Space Station

This is just to see what i can make out of the Sci-fi racing game's texture, i ended up with this space relay like station thing. I purposely gave it a harsh purple colored spec map to give it that retro Sci-fi 80's look to it. The Background was done using a stock image which I've manipulated in Photoshop.


Monday 17 November 2014

Demonic Jungle Temple Video


Here I've uploaded my video of the jungle temple level I worked on along with Tim Went (http://teejaedubart.blogspot.com.au/), I've added a background tribal-like theme to cut the silence as the level never had any sound added. The video starts with a well presented camera flythrough then followed by a test build showing you how the first person camera interacts within the environment and some closer looks at the background objects. It consists of mainly prefabs and was built with a strict scale and geometry code. The assets i worked on are in a previous post. Hope you enjoy it.

Monday 10 November 2014

Human Male Character Video

This is another video on my youtube, it's the male character I've been working on, fully textured and animated.


Tank Game Assets Video

Here's a video version of the Tank Game Presentation of the assets I made, it's on my youtube account. I've also provided a link to Matthew Mile's sound cloud account, credits for the music. 


Monday 3 November 2014

Human Male Character : Earlier Stages

This was particularly an abandoned segment during the project which i was going to process earlier, but some screen shots of modelling the base meshes where found in my PC so i might as well post them here, it will give some insight of my pipeline workflow which i hope to detail in a future post. This was progress of modelling the African Male Head and a screenshot of both the Caucasian and African heads together in Maya as base meshes before being sent into Zbrush.


Human Male character : Concept to Final

This was posted earlier this year, however a glitch happened and some images that i uploaded went missing and posts had to be updated to be fixed. luckily it only took one night. This concept presentation was one of the images that went missing and i thought i might just re-post it. The original post just got cleaned up, features just separate renders of both the African and Caucasian males and the original concept art of all the ideas generated before settling with the business suit.


The character went as planned, it was a simple concept, i couldn't think of a back story for these characters

Story-wise, this character was somewhat not applicable being just a background feature for renders and game environments, but i would note down possible scenarios that they can be featured in (such as an office interior render, a sandbox type game that takes place in an urban environment), or i could say "there once was a man who walked to work with his briefcase, the end". Stepping away from the sarcasm, this was a fun project, however skinning the mesh to the rig was probably a hair grabbing experience which i hope to get better at. Here are a couple of screenshots of the high poly models....


Human Male Character: Added customization

Earlier this year my class had an assignment to model a character, textured them, rig them and animate. It was fun and challenging. However i didn't present the character completely so a few pics have been added, some cat t-shirts and different colored trousers. He's been place into unity and has a walking, running and idling cycle which i'll show in another post. 

I thought i'd make some extra diffuse maps to customize the character a bit more, a couple of motivating cat t-shirts, and some funky business wear for the less serious worker.
This was meant to be a joke, but i thought i may as well present it, he can be placed in a variety of environments, applied into architectural renders of future developments, he can be the guy that rings the alarm when a thief protagonist of a game robs a bank or maybe the big bosses entourage. 

Tank Game: Background Assets Presentation

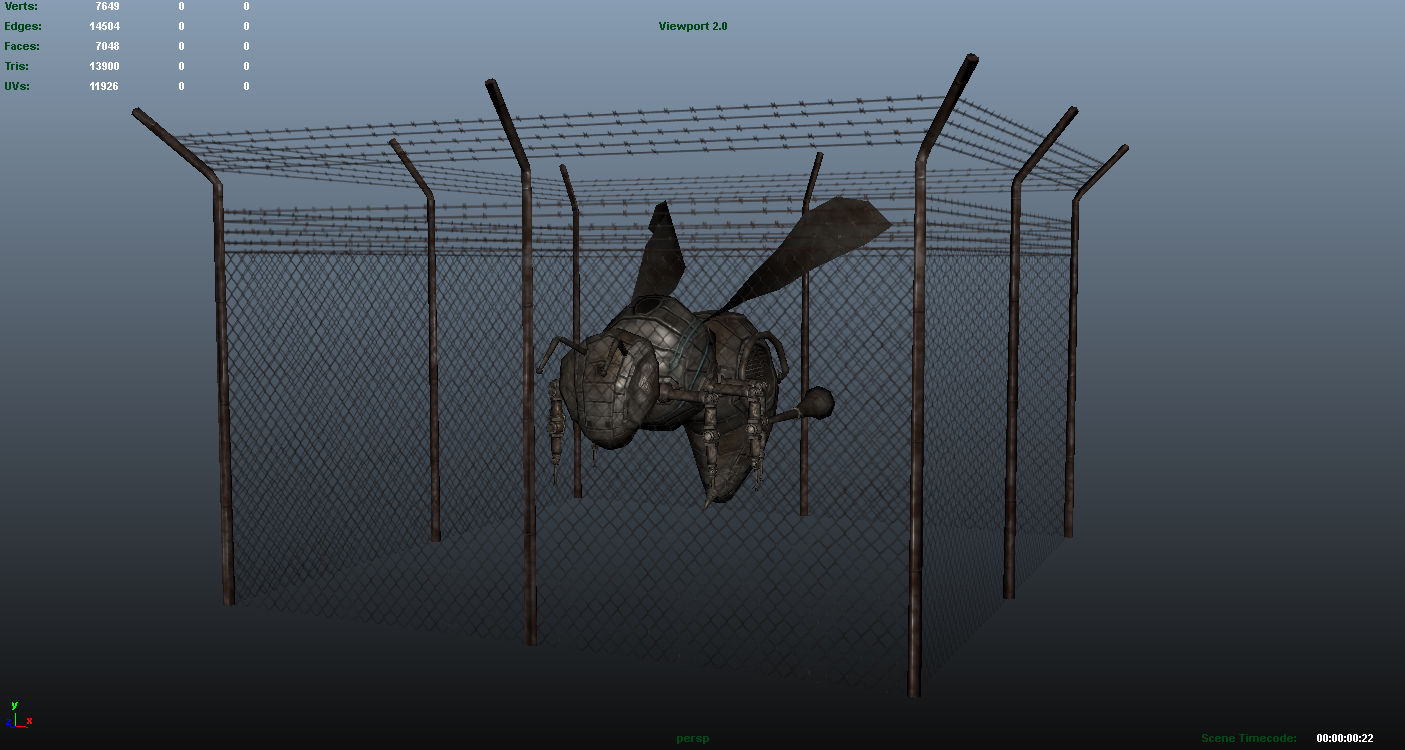
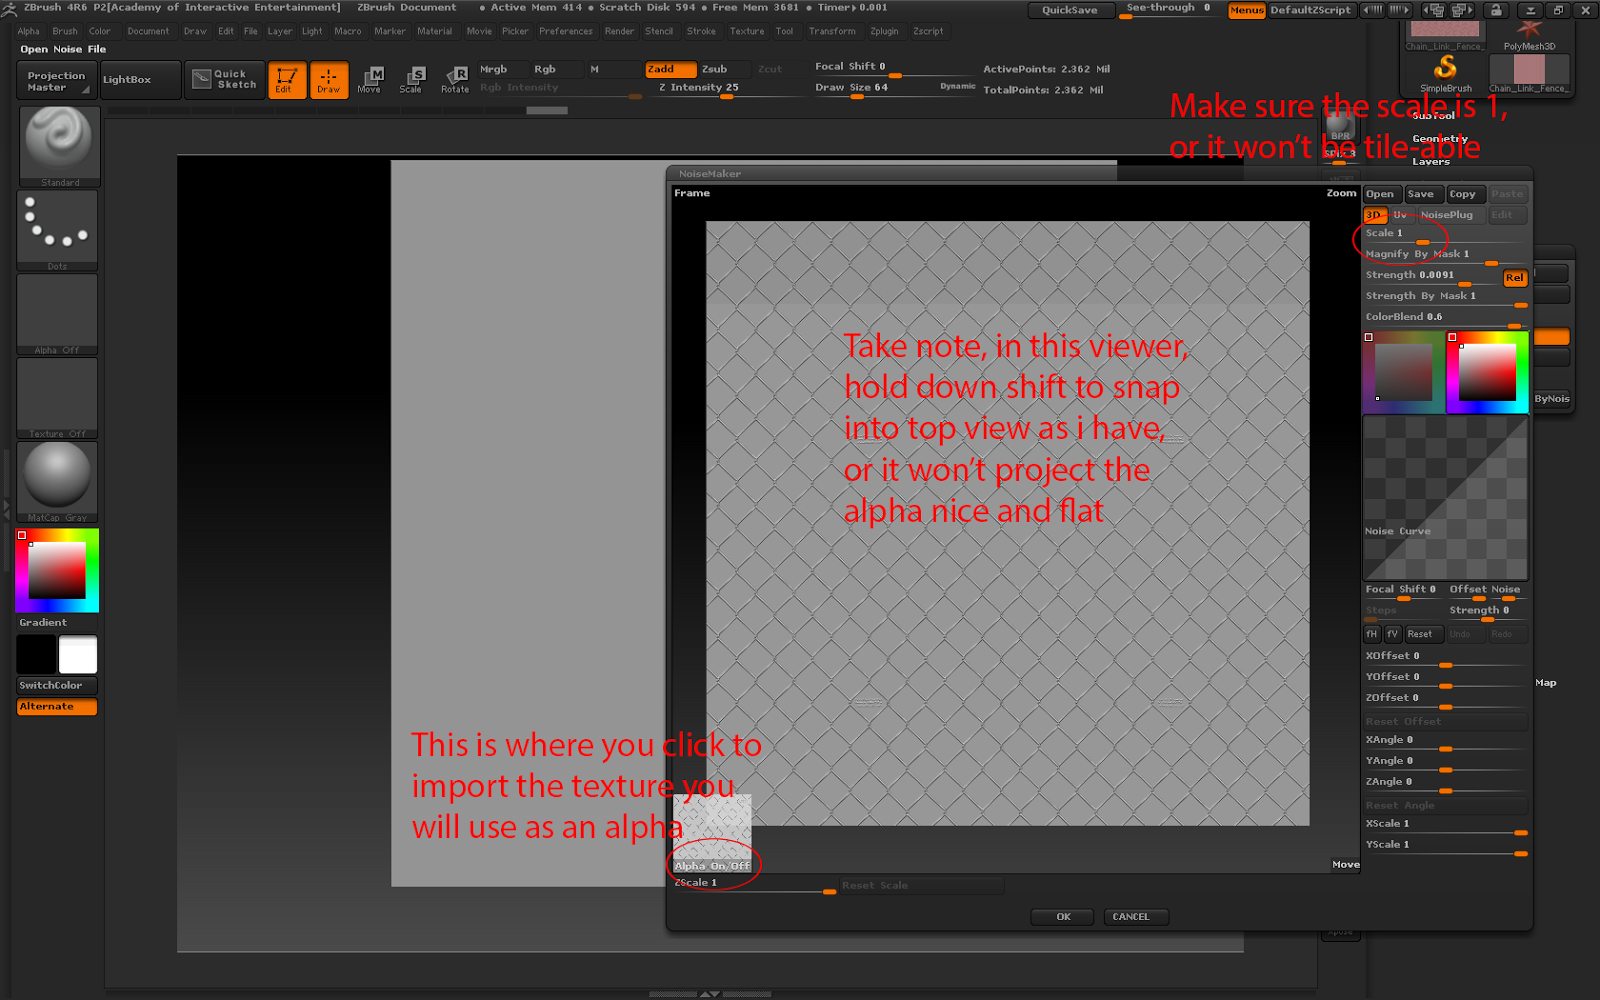
Finally all the assets are presented with a full texture render and a wire frame low poly mesh display. Mentioned earlier the main tank has it's textured applied, but here you can see the object in it's un-textured form, just with all the other objects as well. Most of them turned out as expected, I think i should've spent more time on the diffuse map of the enemy tank by adding the same scratch marks, but at the same time it looks clean and majestic, kinda like with a typical game story where the bad guys work for a majestic company with a big boss of some sort, they have all the tricks of the trade while you're the protagonist covered in dents, scratches and bruises etc. Background vehicles were added to the scene, just to fill the background as the name states but are also target practice at the starting stage of the game, i kept them low detailed since they're not the primary focus. Damaged forms were added, this way it can be indicated that they have been destroyed, at one point with the test build of the game when things were destroyed the only indication was a fire particle that appears on the object, but it would retain the same appearance and stop animating. The rest of the assets where not completely planned, but were for the sole purpose of filling the background, however the sand bags were a last minute addition because when turrets (made by someone else) were placed in the scene it didn't make sense not having barricades. Time was minimally spent on those sand bags as they were pretty simple to make, the texture was generated by a tile-able texture of canvas applied in Zbrush using the surface noise deform-er. Most enjoyable was the junk pile, while the objects were everyday and somewhat mundane boxes with little to no color, there was a level of abstract to it which i enjoyed, also the fact that i'm making a 3D model of an unattractive object which feels somewhat pleasurable (because we all want to model superheroes and fast cars). It is indeed not a rubbish thing to do (no pun intended) but making objects which most people wouldn't do seems to be a fun thing for me. This was quite some fun, i knew nothing of tanks when i made these, but learnt a fair bit on their anatomies,  and add to that a variety of real life objects such as fences and plants, i made an alpha map, i made a vehicle, i made rubble. I shall conclude with the presenting.

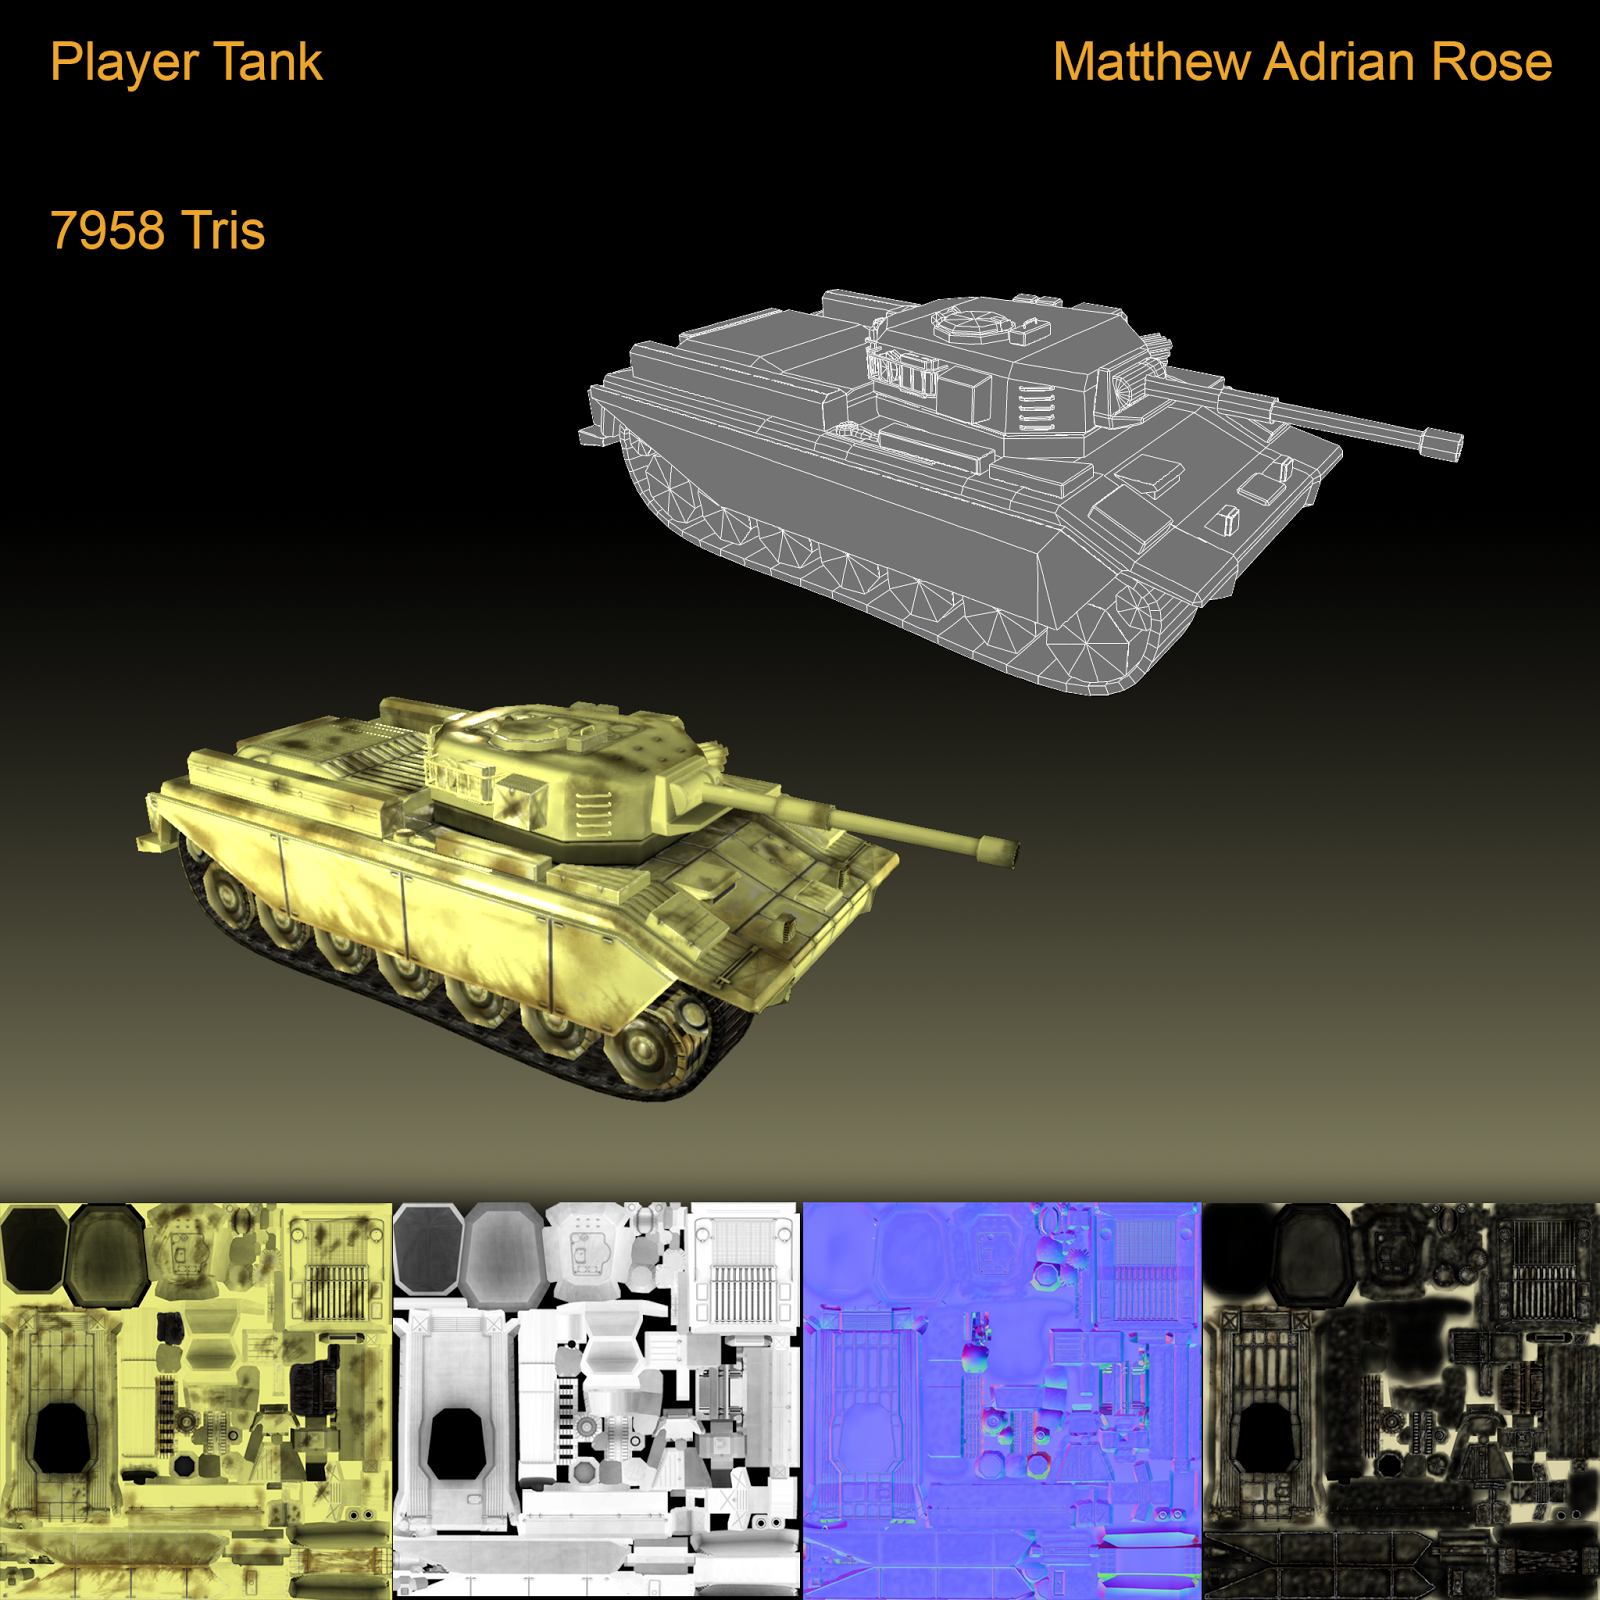
The main star of the game, i hope to do more renders and snapshots of this and have it featured as a masterpiece.


The textures took so much room in this presentation slide, so i've added a standalone render combined with wireframe below for a closer look.....

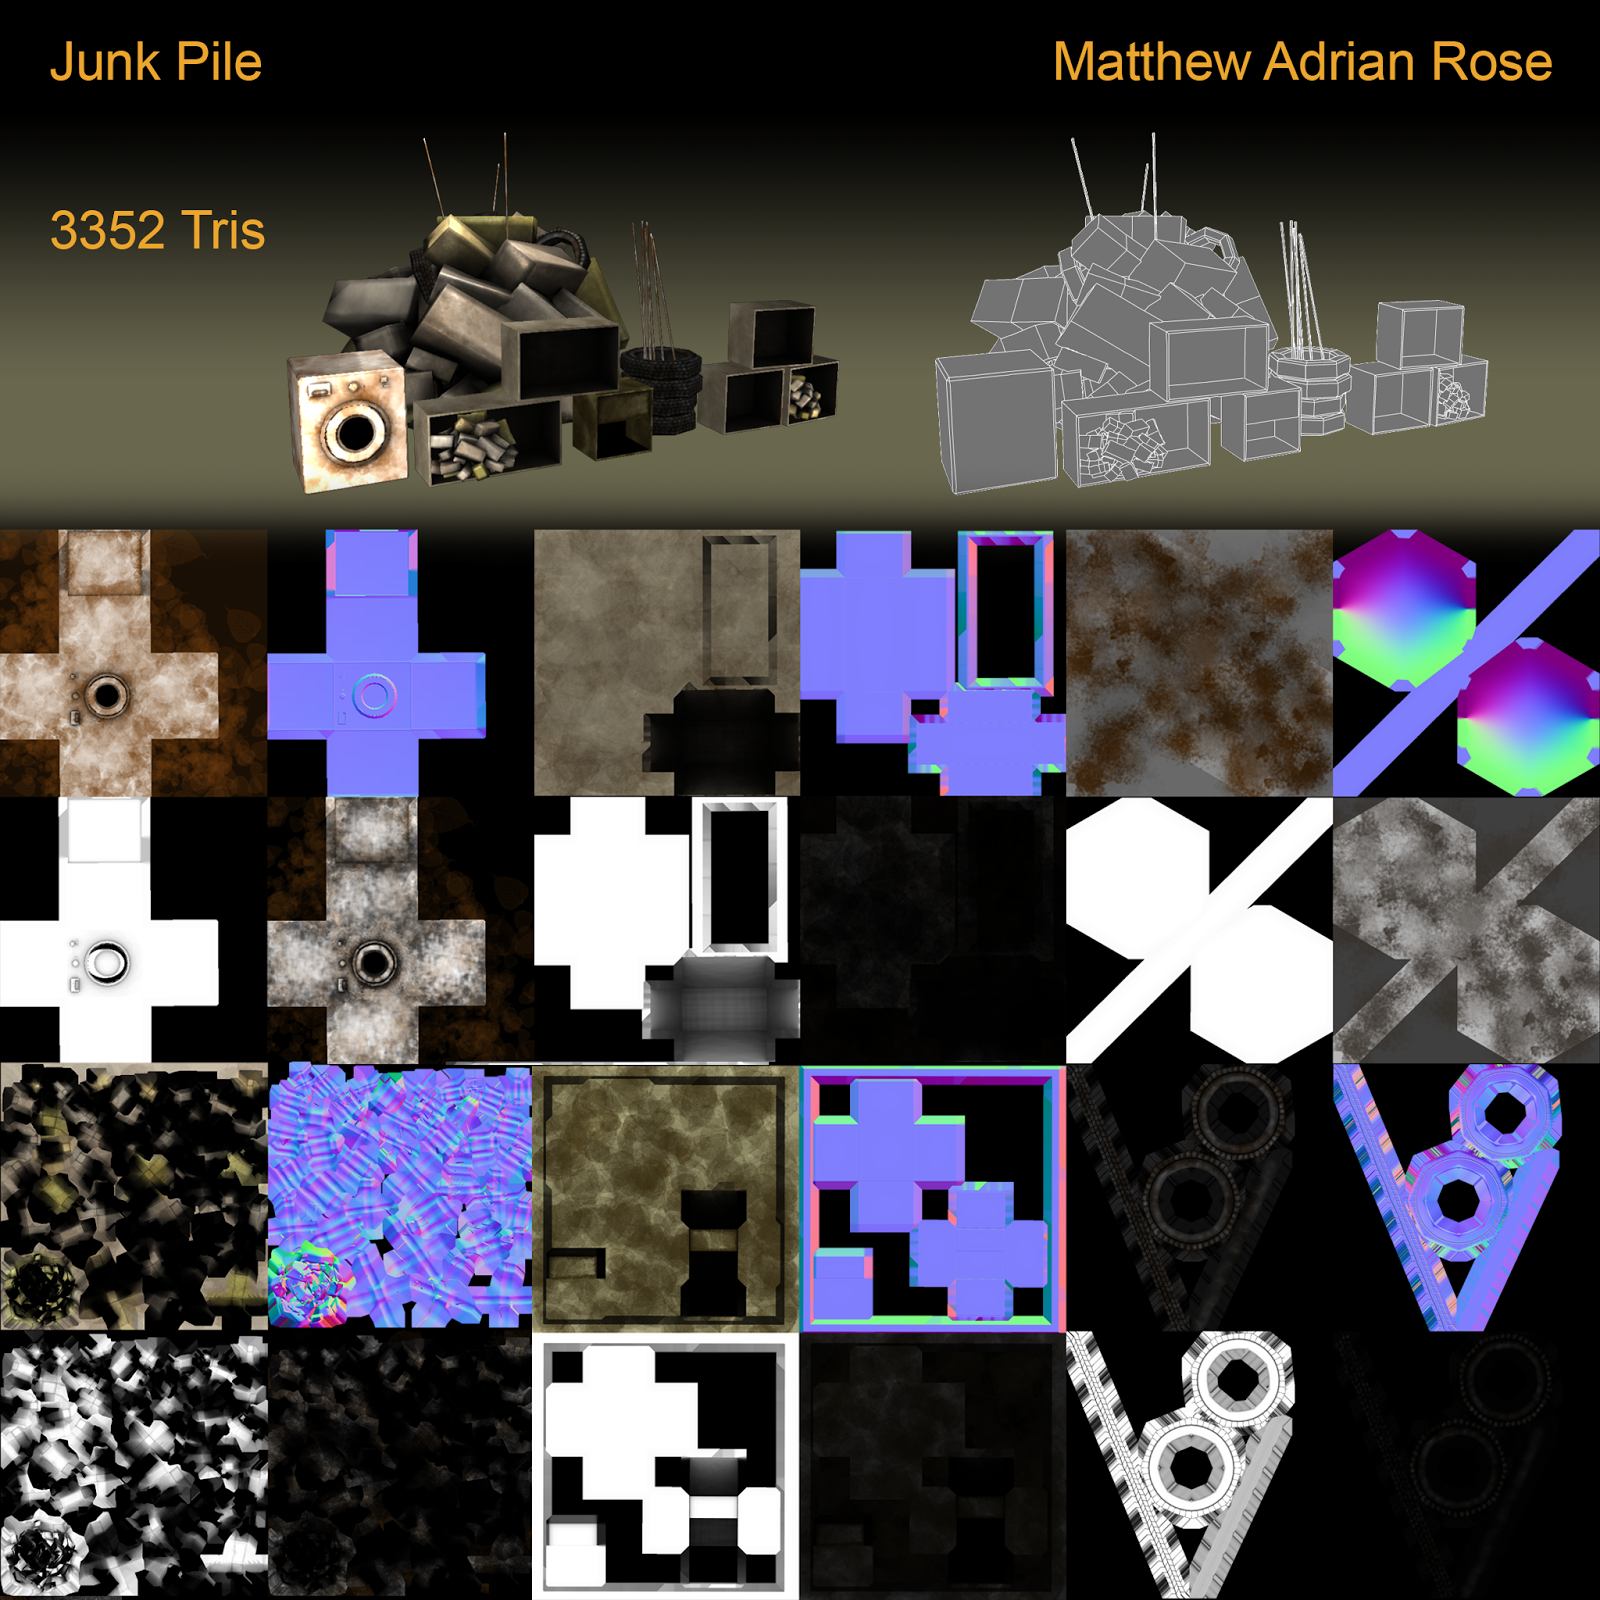
And here's the junk pile at a closer glance, possibly the background piece i enjoyed modelling the most

So i hope you enjoyed looking at my 3D models, i hope to continue modelling things and improving my quality of art. I hope to make tile-able texture packs of varying game genres, and to also model objects for not just games, but also simulation purposes as well. Thanks for viewing.

Tuesday 28 October 2014

Junk Pile Modeled in Maya

To fill up the scene a bit more, i have modeled and textured a pile of junk, i can add this to the series of game assets I've made previously (please check my earlier posts) so that i can duplicate them, manipulate then place them until i have a bit of a landscape scene to play with. I started by making a cubic rectangular shaped mesh (a box), added divisions then used the modify topology tool in Maya to get the a little bit crooked (Very low brush strength). I would have there variations of these then duplicate them until i have a messy looking pile. I made a dome that sits under the top layer of boxes so that i can bake the illusion of a messy pule onto it, i kept the outer layer of boxes as part of the low poly model as you will see below. Everything else was pretty simple, the Tyre needed a bit of work, i duplicated a box looking mesh and then lined them up, combined meshes then added a bend deform-er to it. I'd then make the bend 180 so that it becomes circular, then have that floating on the outside of a low poly 'donut' or torus shape. This would be baked on.Check the images below:


Monday 27 October 2014

Chain Link Fence Alpha Map

Using Targa or .tga files, i made a Transparent Alpha Map of a chain link fence. This was featured in a post earlier but i removed it, it can be seen in other posts along with the background assets for a tank game i'm doing the art lead for. I place my Robotic Bee inside a closure to see what the alpha looks like:

The Alpha seems to be working in Maya. Despite Having back-face culling turned on, the .tga file texture of the fence remains double sided
So i have my method of achieving this tilable texture. I would make a simple perfectly square shaped plane in Maya, this would be the low poly to where the high poly details will be baked onto. After exporting the plane as my low poly obj file with "LP" in the name meaning Low-Poly, i would then add divisions then export that one as another .obj file. I would add "MeshEdit" to the name which means i'm going to put the mesh in Zbrush and edit it, it is my own naming convention, we all have our own ways of naming and doing things. I would import the MeshEdit file into Zbrush and keep subdividing the surface (without smoothing) until i hit the million mark in active points. This is where i apply the surface noise maker. In the image below you can see I have used a tile-able texture of a chain link fence i found on the internet and have it projected from directly above, the texture gets projected depending on what angle you are previewing the object your adding the surface detail to. It is highlighted in the image on how to do this correctly:

My instructions are in red text
After i'm happy with the surface noise maker in Zbrush, i apply it to the mesh, then export is as a .obj file with "HP" in the name of the file meaning "High Poly". The low and high polys are then draged into Xnormal for baking, where i achieve my Normal and Ambient Occlusion maps. I will use the Ambient Occlusion for the basis of my Diffuse and Spec Maps which i'll hand paint in Photoshop.

Using the ambient occlusion i have achieved from Xnormal, i make selections in Photoshop, modify the border sizes of those selections and hit delete so i can achieve the gaps between the chain links
I keep these selections active when i paint colors and details onto the chain links, i need to keep the gaps uninterrupted. The gaps will be black in the spec map so that there are no light reflections in the gaps. The Diffuse map will have the alpha channel place into, it will be in the .tga format. Here we have an alpha, it took multiple attempts.

Wednesday 22 October 2014

Test Scene of Tank Game

Here we have a scene set up with the assets in place, this is at an early stage and other members of the group are working on different scenes. I am checking to see how the assets I've worked on appear in unity to make sure their shaders are working fine. I have put together a farm town block and a junkyard that we can place in different areas of the map. I'll need to fix the shaders of the chain link fences, the main priority was to get everything in scale first as we can always apply the shaders at any time to the pre-fabs.

Tuesday 14 October 2014

Scene setup: Background assets put together to make a game setting

Together the assets i've worked on go well into a post apocalyptic setting, i have used sculpt geometry in Maya to modify the car into looking crushed and wrecked. I gave it a new color texture to make it look burnt and dirty. I have used the fence in the previous post, but the new assets here are the rusty road signs. The Ground texture is not mine, it is "Seamless dirt texture by hhh316" (http://hhh316.deviantart.com/art/Seamless-dirt-texture-163426021). I shall give credit. I hope to do a render turntable of this scene anytime soon, i'll have to retrieve some concrete barriers i made which got lost in a system wipeout (my project leader may have copies). Nevertheless, here's another display scene.


Wednesday 1 October 2014

RoboBee or Robotic Steampunk Bee: An old project from a year ago restored like an old car

I got a bit bored during my time at school and just foraged through my memory sticks then ran into this Robotic Bee which i totally forgot about, so being bored i decided to pick up from where i gave up. To me it's not a success, the poly count is far to high for being involved in large swarms and there was never any colored concept art done for it. However better than nothing, i decided to have a go texturing it then rigging it so at least it can do something. I spent hours on it, after all it's worth doing. Some say do not be afraid to start again regardless of a project remaining unfinished, some say continue until it's done, or work on multiple projects so if i get bored of one, work on the other. Many ways of dealing with projects leads to a grey area on what is the best approach or pipeline workflow, but i decided to have a crack at restoring projects like restoring a vintage car. So here we have a Bee that started as a tutorial in class on how to model and texture basics which was to look like your average bee, became a clean metallic robot, finally deciding on a rusted post apocalyptic look that's been rigged and fully colored and textured.

Thanks for viewing.
The original Design, as i mentioned lack of color
Work in Progress
Side Progress
Here we have the high poly model, i added more detail after that which you'll see on the final product.


Now for the final look.


I used an alpha in Zbrush to get this detail on the eyes, it was a tile-able microphone texture


My Bee has iron guts. Yeah