Here's a video version of the Tank Game Presentation of the assets I made, it's on my youtube account. I've also provided a link to Matthew Mile's sound cloud account, credits for the music.
Showing posts with label Tank. Show all posts
Showing posts with label Tank. Show all posts
Monday, 10 November 2014
Monday, 3 November 2014
Tank Game: Background Assets Presentation
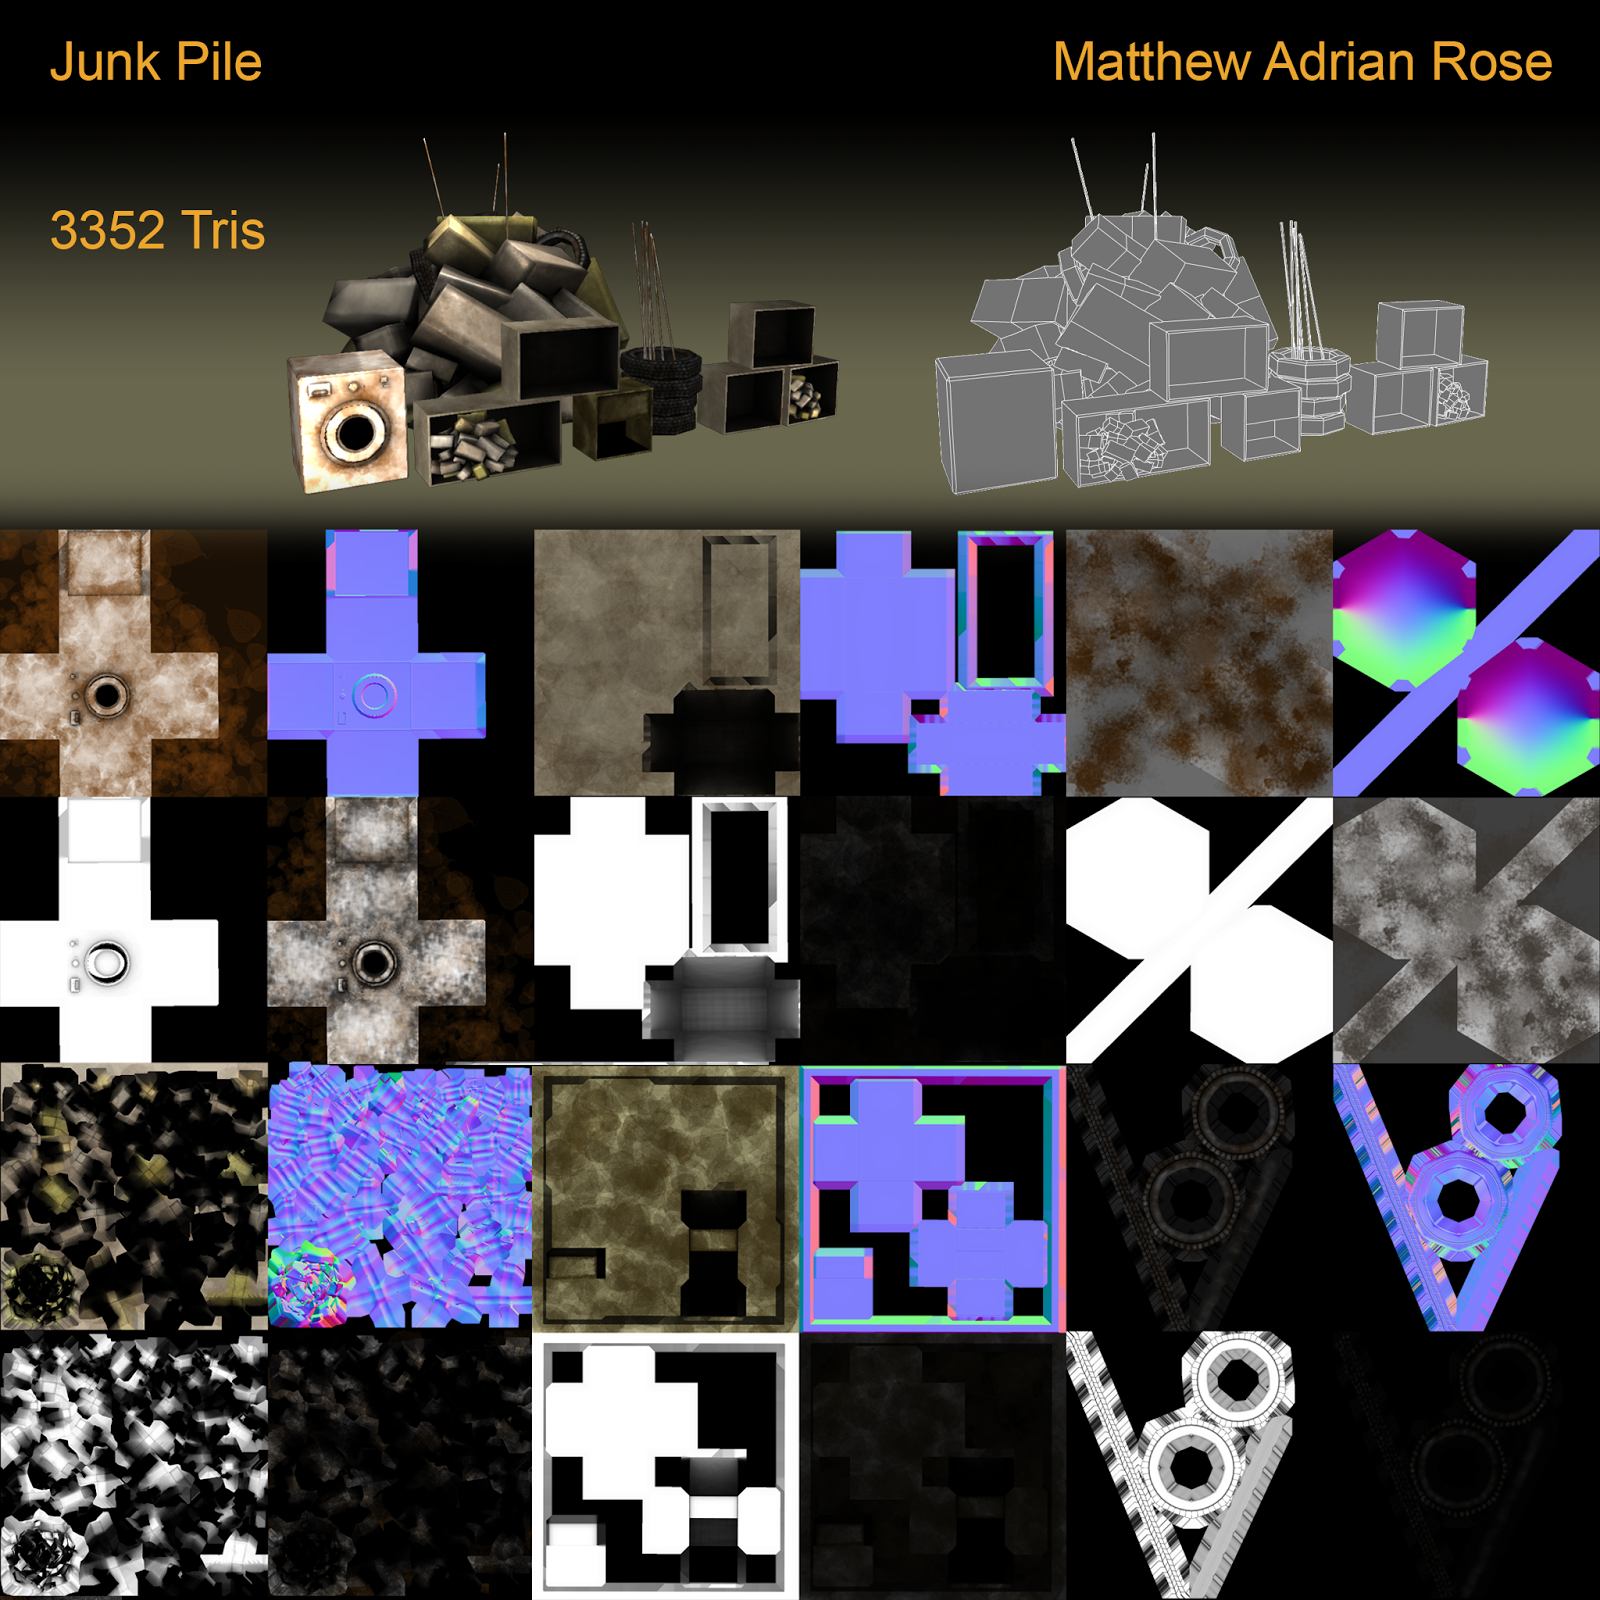
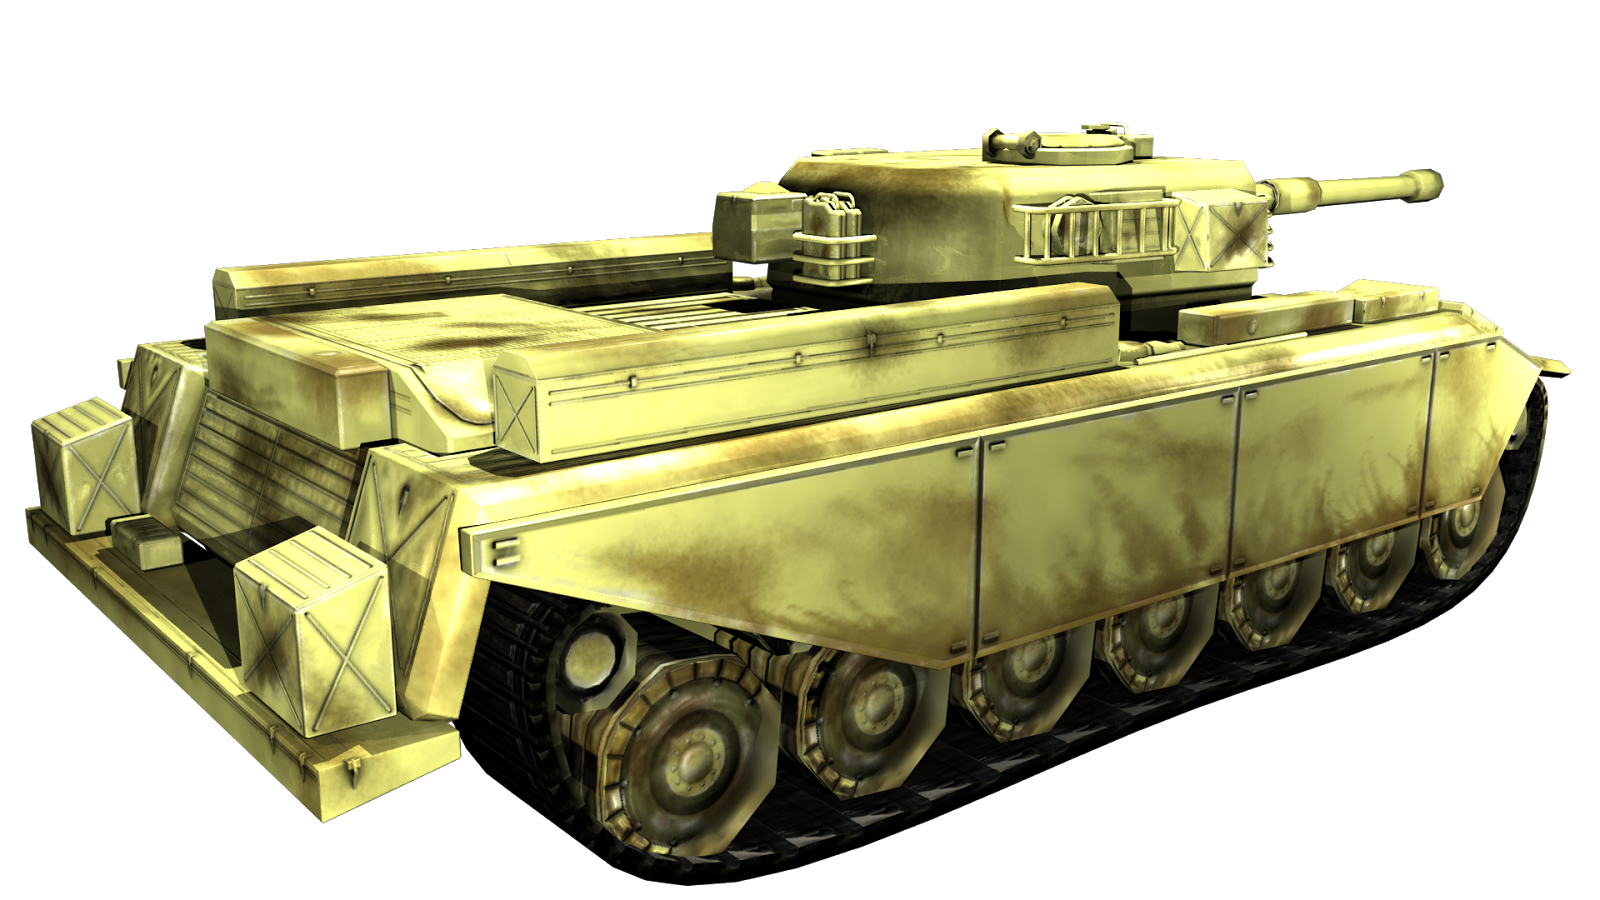
Finally all the assets are presented with a full texture render and a wire frame low poly mesh display. Mentioned earlier the main tank has it's textured applied, but here you can see the object in it's un-textured form, just with all the other objects as well. Most of them turned out as expected, I think i should've spent more time on the diffuse map of the enemy tank by adding the same scratch marks, but at the same time it looks clean and majestic, kinda like with a typical game story where the bad guys work for a majestic company with a big boss of some sort, they have all the tricks of the trade while you're the protagonist covered in dents, scratches and bruises etc. Background vehicles were added to the scene, just to fill the background as the name states but are also target practice at the starting stage of the game, i kept them low detailed since they're not the primary focus. Damaged forms were added, this way it can be indicated that they have been destroyed, at one point with the test build of the game when things were destroyed the only indication was a fire particle that appears on the object, but it would retain the same appearance and stop animating. The rest of the assets where not completely planned, but were for the sole purpose of filling the background, however the sand bags were a last minute addition because when turrets (made by someone else) were placed in the scene it didn't make sense not having barricades. Time was minimally spent on those sand bags as they were pretty simple to make, the texture was generated by a tile-able texture of canvas applied in Zbrush using the surface noise deform-er. Most enjoyable was the junk pile, while the objects were everyday and somewhat mundane boxes with little to no color, there was a level of abstract to it which i enjoyed, also the fact that i'm making a 3D model of an unattractive object which feels somewhat pleasurable (because we all want to model superheroes and fast cars). It is indeed not a rubbish thing to do (no pun intended) but making objects which most people wouldn't do seems to be a fun thing for me. This was quite some fun, i knew nothing of tanks when i made these, but learnt a fair bit on their anatomies, and add to that a variety of real life objects such as fences and plants, i made an alpha map, i made a vehicle, i made rubble. I shall conclude with the presenting.
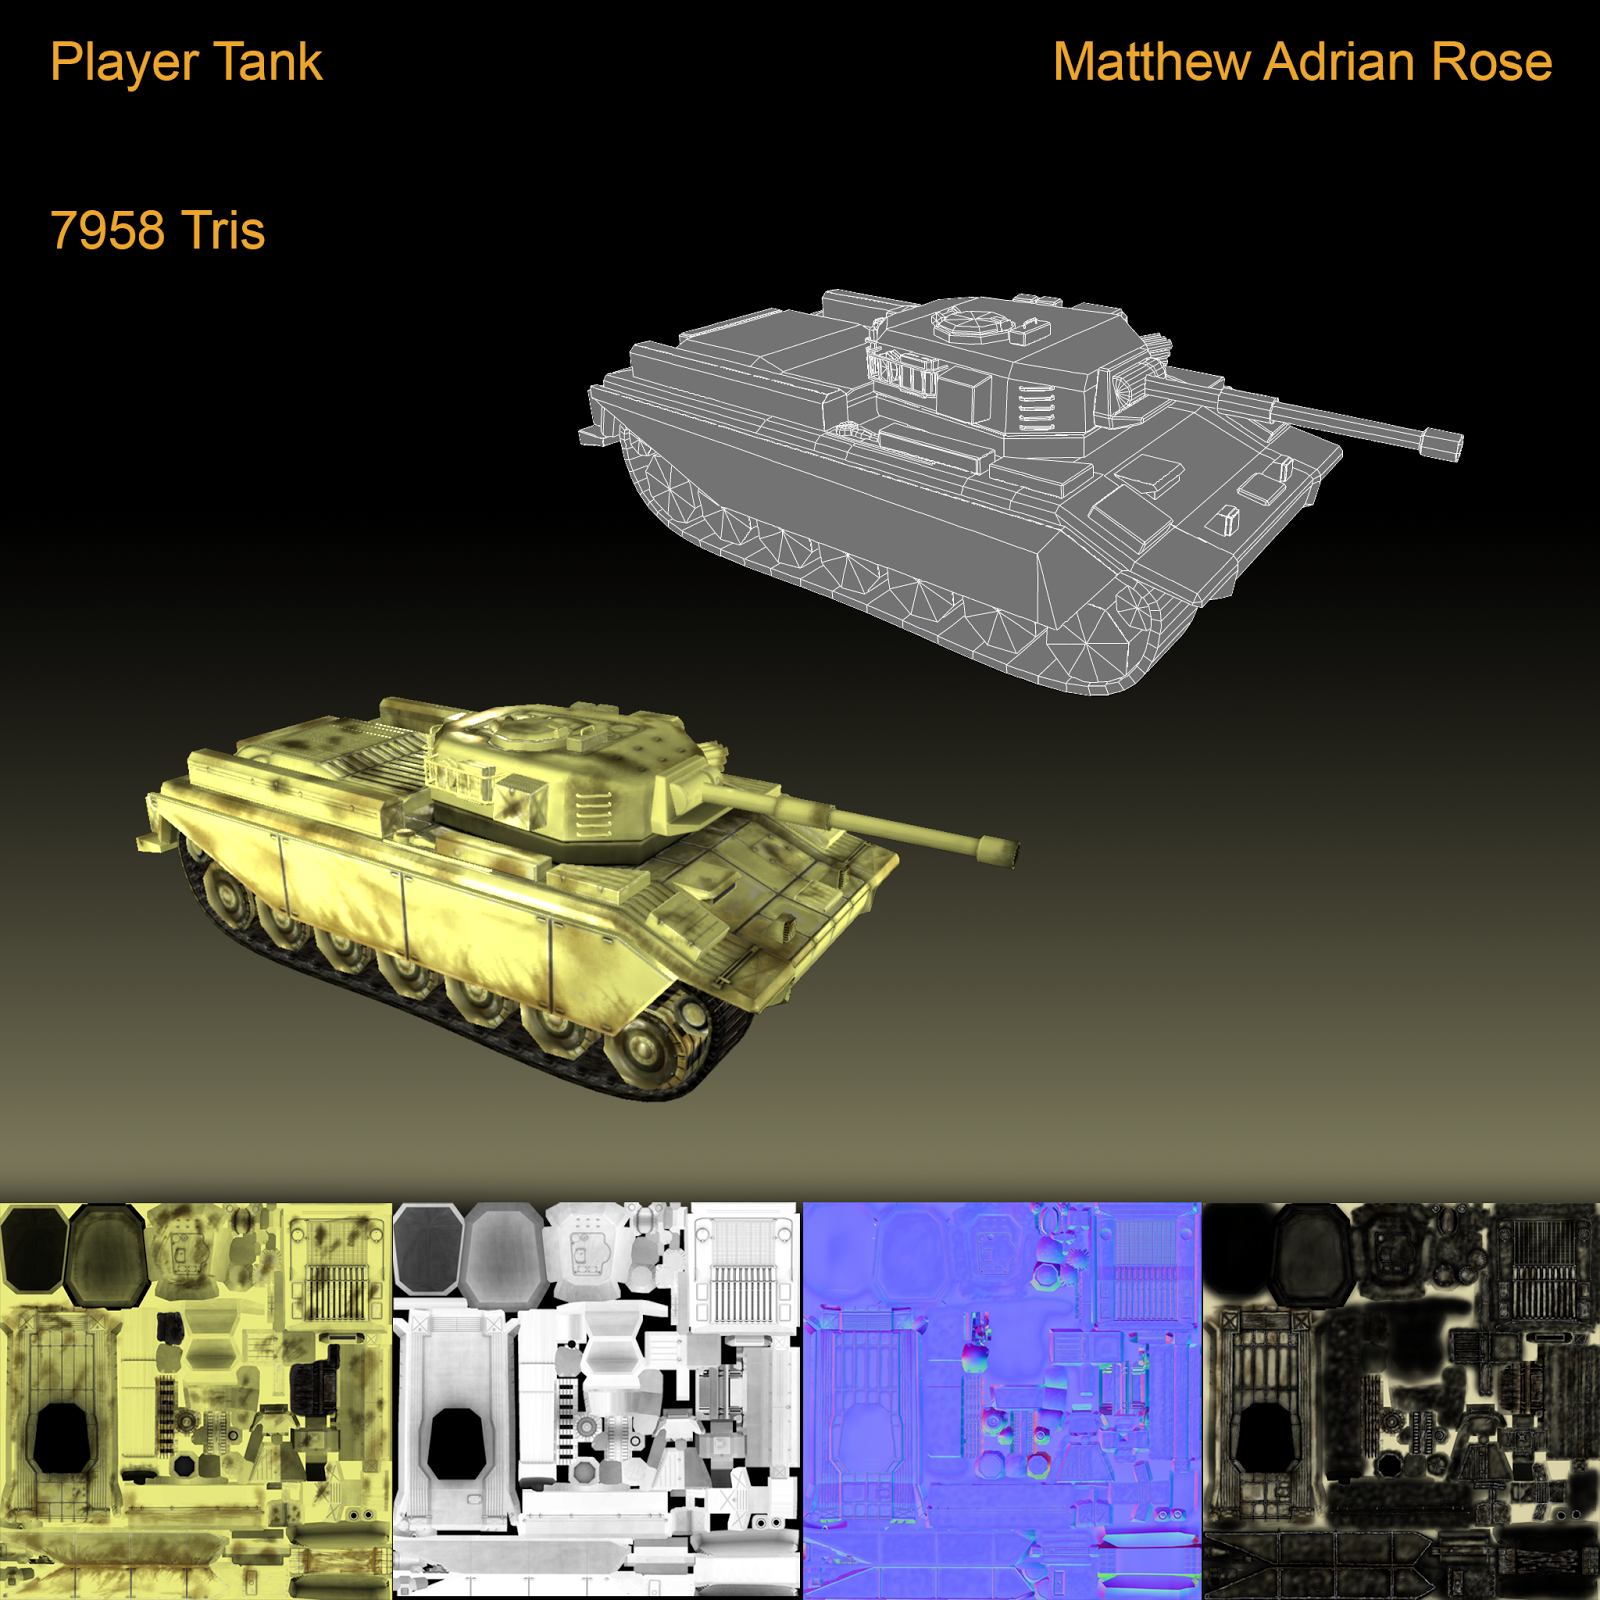 |
| The main star of the game, i hope to do more renders and snapshots of this and have it featured as a masterpiece. |


 |
| The textures took so much room in this presentation slide, so i've added a standalone render combined with wireframe below for a closer look..... |
 |
| And here's the junk pile at a closer glance, possibly the background piece i enjoyed modelling the most |
So i hope you enjoyed looking at my 3D models, i hope to continue modelling things and improving my quality of art. I hope to make tile-able texture packs of varying game genres, and to also model objects for not just games, but also simulation purposes as well. Thanks for viewing.
Wednesday, 22 October 2014
Test Scene of Tank Game
Tuesday, 14 October 2014
Scene setup: Background assets put together to make a game setting
Together the assets i've worked on go well into a post apocalyptic setting, i have used sculpt geometry in Maya to modify the car into looking crushed and wrecked. I gave it a new color texture to make it look burnt and dirty. I have used the fence in the previous post, but the new assets here are the rusty road signs. The Ground texture is not mine, it is "Seamless dirt texture by hhh316" (http://hhh316.deviantart.com/art/Seamless-dirt-texture-163426021). I shall give credit. I hope to do a render turntable of this scene anytime soon, i'll have to retrieve some concrete barriers i made which got lost in a system wipeout (my project leader may have copies). Nevertheless, here's another display scene.


Monday, 22 September 2014
Making a Tank Game: Part 5: Presenting
Time to showcase the two stars, here is just a render turntable of both the Player Tank and the Enemy tank, i got my friend to do some sounds for the game so I've added the soundtrack and the explosion sound effect to evoke the mood. The video is on my youtube: https://www.youtube.com/channel/UCRmfQ82ZhG_YLOjOF8Wah8w
Here it is, enjoy:
Here it is, enjoy:
Tuesday, 16 September 2014
Making a Tank Game: Some extra background assets
I've done some background assets for the tank game I've been working on, these vehicles are doing to be destructible, the wheat and lampposts will be knocked down upon contact while riding the tank.
Here's a render I've put together to show off the assets I've done:

Basically the pipeline workflow for the vehicles was modelling the basic geometry in Maya for the low poly objects, then adding details such as the lights and grilles, baking in Xnormal then Photo shopping over the Ambient Occlusion. With the lamposts it was similar except i exported the main wooden log into Zbrush then brushed in the wood grains using a clay build-up alpha. For the plants i would model them in Zbrush first, then try to make the lowest possible poly mesh for them to be baked on. The weeds are just planes with alphas, the Wheat stalks are 3-sided meshes.
Monday, 15 September 2014
Enemy Tank
Same as the Playable tank i stuck with the same pipeline workflow making this enemy tank. The team decided to go with a blue/grey color that would kinda resemble the Russian blue. It is based of a T-55 model tank, but with some details changed and slightly different proportions.


Making a Tank Game: Part 4: Piecing together, Applying Texture, Preparing for Unity Engine
I've added the textures onto the tank, this is the final (hopefully) appearance it will make (we might add camo and logos later on). It was fun to make, after baking the ambient occlusion and normal maps i decided to duplicate come of the crates around the tank to add details, also the ladder rungs you see on the side of the turret is the same object as the cage holding the crates on the side and the handles on the jerry cans, i've just added edge loops then tweaked them. The tank treads animate along a nurbs curve in Maya, they were made from the one tread piece (i baked some geometry onto a simple prism shape), i duplicated them then added a bend deformer to get them to circle around. then i added a wire tool which was a circle shaped nurbs curve, moved some vertices of that nurbs curve untill i got the shape of the treads.


Monday, 1 September 2014
Making a Tank Game: Part 2: Modeling High and Low poly models
 |
| Low poly model ready for baking |
 |
| High poly model ready for baking |
 |
| A series of meshes i used for kitbashing, take note of the tri count in the top left corner, i would copy these to get as much detail as possible on the tank |
Subscribe to:
Posts (Atom)