Tuesday 28 October 2014

Junk Pile Modeled in Maya

To fill up the scene a bit more, i have modeled and textured a pile of junk, i can add this to the series of game assets I've made previously (please check my earlier posts) so that i can duplicate them, manipulate then place them until i have a bit of a landscape scene to play with. I started by making a cubic rectangular shaped mesh (a box), added divisions then used the modify topology tool in Maya to get the a little bit crooked (Very low brush strength). I would have there variations of these then duplicate them until i have a messy looking pile. I made a dome that sits under the top layer of boxes so that i can bake the illusion of a messy pule onto it, i kept the outer layer of boxes as part of the low poly model as you will see below. Everything else was pretty simple, the Tyre needed a bit of work, i duplicated a box looking mesh and then lined them up, combined meshes then added a bend deform-er to it. I'd then make the bend 180 so that it becomes circular, then have that floating on the outside of a low poly 'donut' or torus shape. This would be baked on.Check the images below:


Monday 27 October 2014

Chain Link Fence Alpha Map

Using Targa or .tga files, i made a Transparent Alpha Map of a chain link fence. This was featured in a post earlier but i removed it, it can be seen in other posts along with the background assets for a tank game i'm doing the art lead for. I place my Robotic Bee inside a closure to see what the alpha looks like:

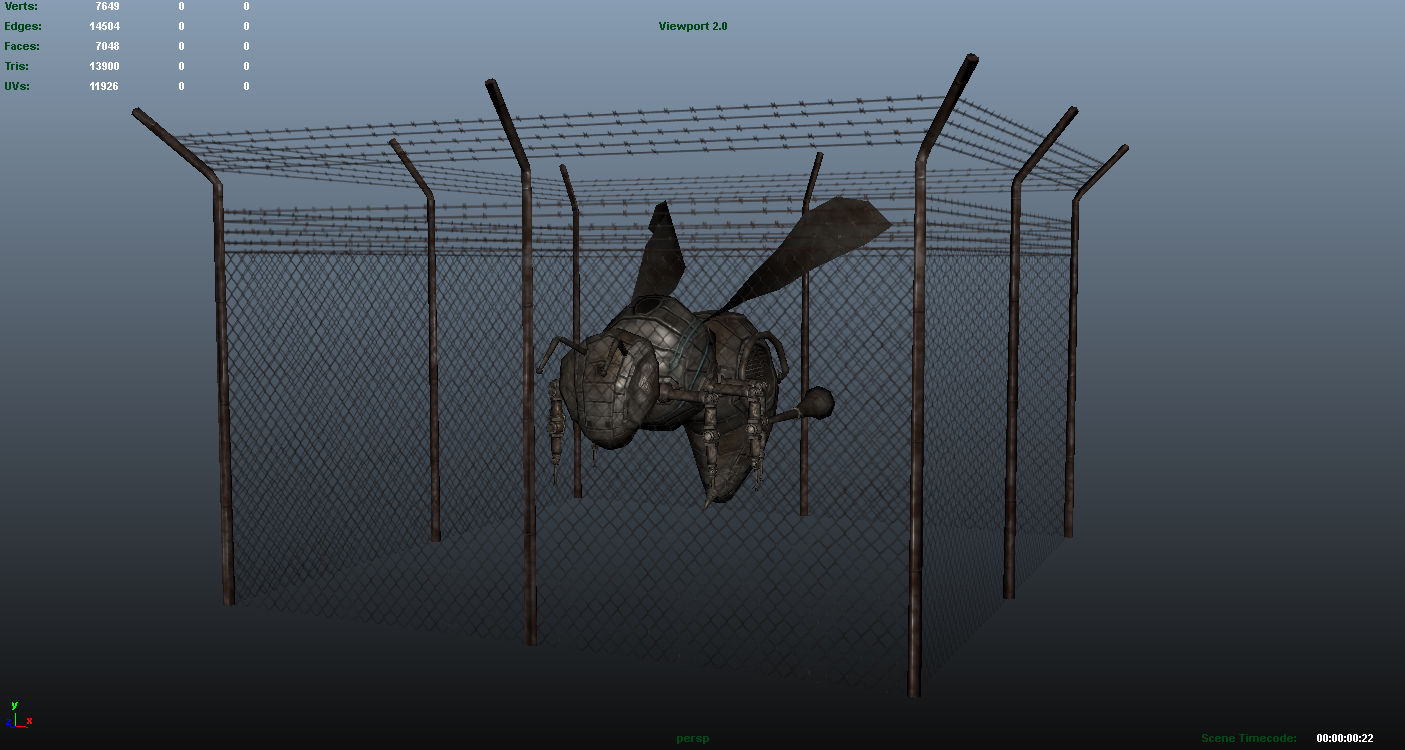
The Alpha seems to be working in Maya. Despite Having back-face culling turned on, the .tga file texture of the fence remains double sided
So i have my method of achieving this tilable texture. I would make a simple perfectly square shaped plane in Maya, this would be the low poly to where the high poly details will be baked onto. After exporting the plane as my low poly obj file with "LP" in the name meaning Low-Poly, i would then add divisions then export that one as another .obj file. I would add "MeshEdit" to the name which means i'm going to put the mesh in Zbrush and edit it, it is my own naming convention, we all have our own ways of naming and doing things. I would import the MeshEdit file into Zbrush and keep subdividing the surface (without smoothing) until i hit the million mark in active points. This is where i apply the surface noise maker. In the image below you can see I have used a tile-able texture of a chain link fence i found on the internet and have it projected from directly above, the texture gets projected depending on what angle you are previewing the object your adding the surface detail to. It is highlighted in the image on how to do this correctly:

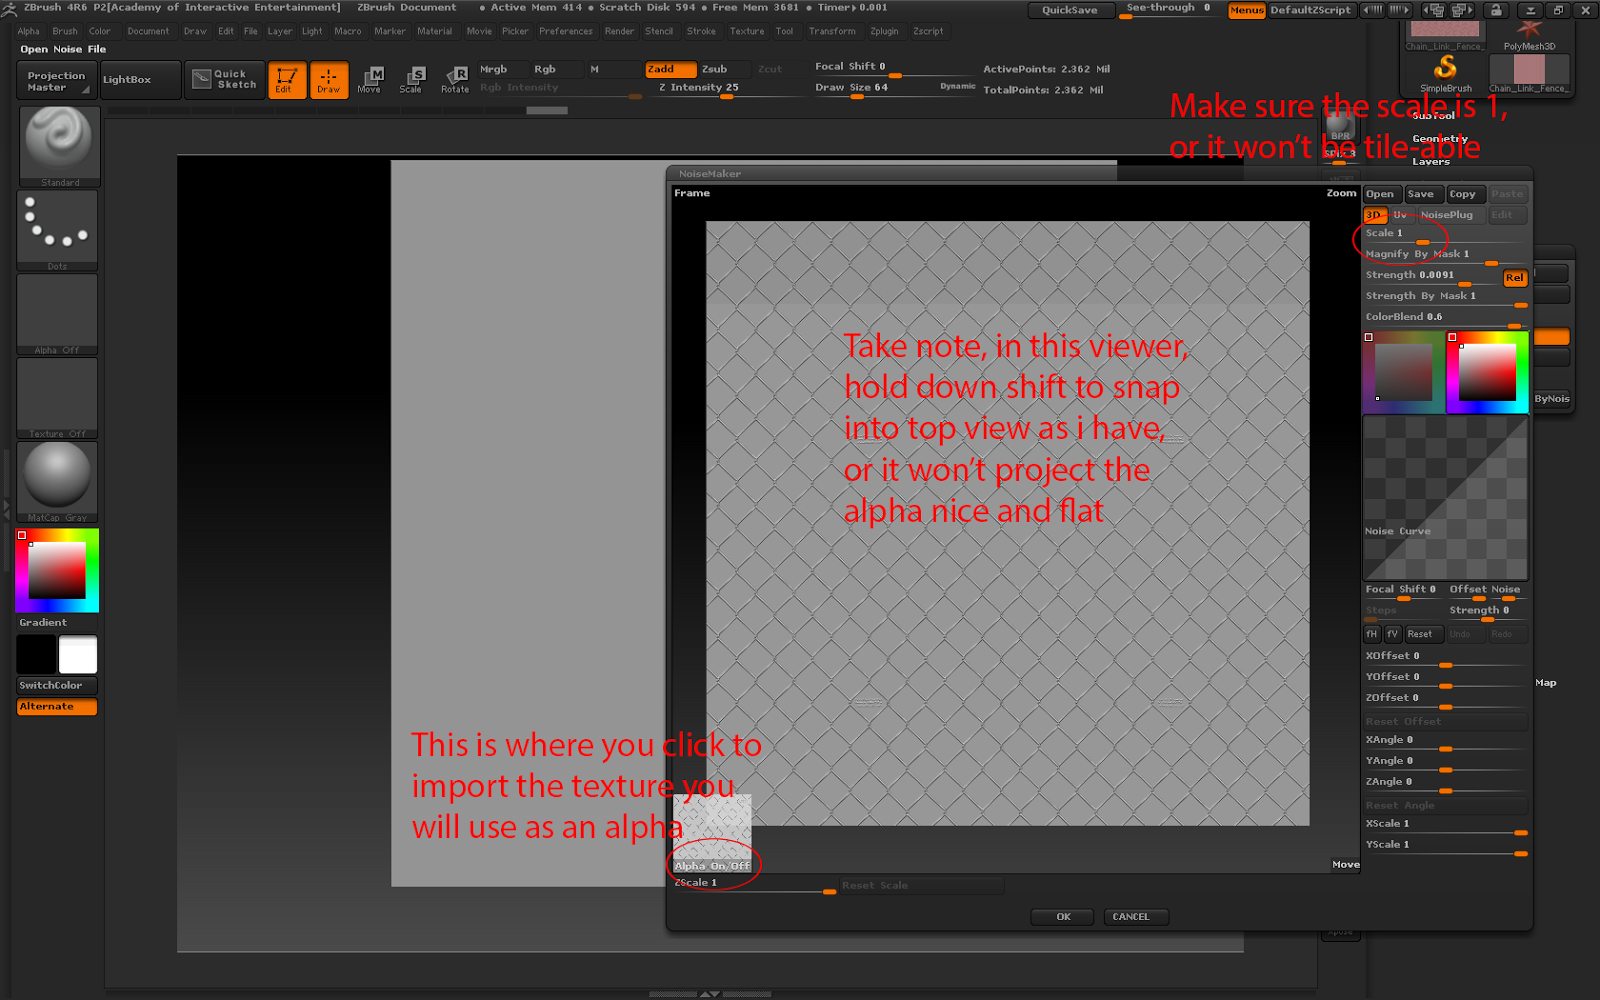
My instructions are in red text
After i'm happy with the surface noise maker in Zbrush, i apply it to the mesh, then export is as a .obj file with "HP" in the name of the file meaning "High Poly". The low and high polys are then draged into Xnormal for baking, where i achieve my Normal and Ambient Occlusion maps. I will use the Ambient Occlusion for the basis of my Diffuse and Spec Maps which i'll hand paint in Photoshop.

Using the ambient occlusion i have achieved from Xnormal, i make selections in Photoshop, modify the border sizes of those selections and hit delete so i can achieve the gaps between the chain links
I keep these selections active when i paint colors and details onto the chain links, i need to keep the gaps uninterrupted. The gaps will be black in the spec map so that there are no light reflections in the gaps. The Diffuse map will have the alpha channel place into, it will be in the .tga format. Here we have an alpha, it took multiple attempts.

Wednesday 22 October 2014

Test Scene of Tank Game

Here we have a scene set up with the assets in place, this is at an early stage and other members of the group are working on different scenes. I am checking to see how the assets I've worked on appear in unity to make sure their shaders are working fine. I have put together a farm town block and a junkyard that we can place in different areas of the map. I'll need to fix the shaders of the chain link fences, the main priority was to get everything in scale first as we can always apply the shaders at any time to the pre-fabs.

Tuesday 14 October 2014

Scene setup: Background assets put together to make a game setting

Together the assets i've worked on go well into a post apocalyptic setting, i have used sculpt geometry in Maya to modify the car into looking crushed and wrecked. I gave it a new color texture to make it look burnt and dirty. I have used the fence in the previous post, but the new assets here are the rusty road signs. The Ground texture is not mine, it is "Seamless dirt texture by hhh316" (http://hhh316.deviantart.com/art/Seamless-dirt-texture-163426021). I shall give credit. I hope to do a render turntable of this scene anytime soon, i'll have to retrieve some concrete barriers i made which got lost in a system wipeout (my project leader may have copies). Nevertheless, here's another display scene.


Wednesday 1 October 2014

RoboBee or Robotic Steampunk Bee: An old project from a year ago restored like an old car

I got a bit bored during my time at school and just foraged through my memory sticks then ran into this Robotic Bee which i totally forgot about, so being bored i decided to pick up from where i gave up. To me it's not a success, the poly count is far to high for being involved in large swarms and there was never any colored concept art done for it. However better than nothing, i decided to have a go texturing it then rigging it so at least it can do something. I spent hours on it, after all it's worth doing. Some say do not be afraid to start again regardless of a project remaining unfinished, some say continue until it's done, or work on multiple projects so if i get bored of one, work on the other. Many ways of dealing with projects leads to a grey area on what is the best approach or pipeline workflow, but i decided to have a crack at restoring projects like restoring a vintage car. So here we have a Bee that started as a tutorial in class on how to model and texture basics which was to look like your average bee, became a clean metallic robot, finally deciding on a rusted post apocalyptic look that's been rigged and fully colored and textured.

Thanks for viewing.
The original Design, as i mentioned lack of color
Work in Progress
Side Progress
Here we have the high poly model, i added more detail after that which you'll see on the final product.


Now for the final look.


I used an alpha in Zbrush to get this detail on the eyes, it was a tile-able microphone texture


My Bee has iron guts. Yeah